
Water Heater Installation: Gas, Electric, Venting, and the T&P Valve
A water heater installed wrong is not just a leak risk, it is a carbon monoxide and explosion risk. Here is the full process for gas and electric units, step by step, plus the venting, relief valve, and thermostat details that get skipped in a rush job.
QUICK ANSWER
Installing a water heater means matching the venting or electrical setup to the unit's category, running a correctly sized gas line with a sediment trap (or a dedicated electrical circuit), piping the T&P relief valve to a safe termination, connecting water lines with dielectric unions, and leak- or pressure-testing before it goes into service. Gas units add a real carbon monoxide risk if the venting is wrong; electric units add a shock and fire risk if the circuit and thermostats are wrong. Most jurisdictions require a permit and inspection for both.
Gas vs. Electric: Two Different Installs
A gas water heater installation is a combustion job: it lives or dies on venting, combustion air, and a leak-tested gas line. An electric water heater installation is an electrical job: it lives or dies on the circuit, the elements, and the two thermostats that control them. Both share the same water-side work (supply lines, T&P valve, drain pan) and both require a permit in most areas. Treating either one as "just swap the tank" is where installs go wrong.
Switching fuel types on a replacement, gas to electric or the reverse, is a bigger job than it looks on paper. Going from electric to gas means adding a gas line, a vent, and the combustion-air calculation from scratch. Going from gas to electric means adding a dedicated high-amperage circuit, which often requires panel capacity that was never sized for it. Both directions typically require their own permit review separate from a straight same-type swap, and both are jobs where trainees benefit far more from practicing the full sequence once, end to end, than from watching it explained.
Gas Water Heater Venting: Atmospheric, Power Vent, and Direct Vent
Gas water heaters are built for one of three venting categories, and the category determines what the install actually looks like:
- Atmospheric (natural draft): the most common residential setup. Hot flue gases rise on their own through a vertical Type B metal vent that terminates above the roofline. No fan, no power needed, but it needs a straight vertical run and adequate combustion air in the room.
- Power vent: a small blower pushes exhaust out mechanically, which lets the unit vent horizontally through a wall instead of needing a vertical chimney chase. Because exhaust temperatures are lower, power vent units commonly use PVC venting, cheaper than metal, but they need a dedicated electrical outlet at the unit and usually a condensate drain.
- Direct vent: sealed combustion that pulls its combustion air from outside through one pipe and exhausts through another, so it does not depend on room air at all. Useful in tight mechanical closets where there is not enough makeup air for an atmospheric unit.
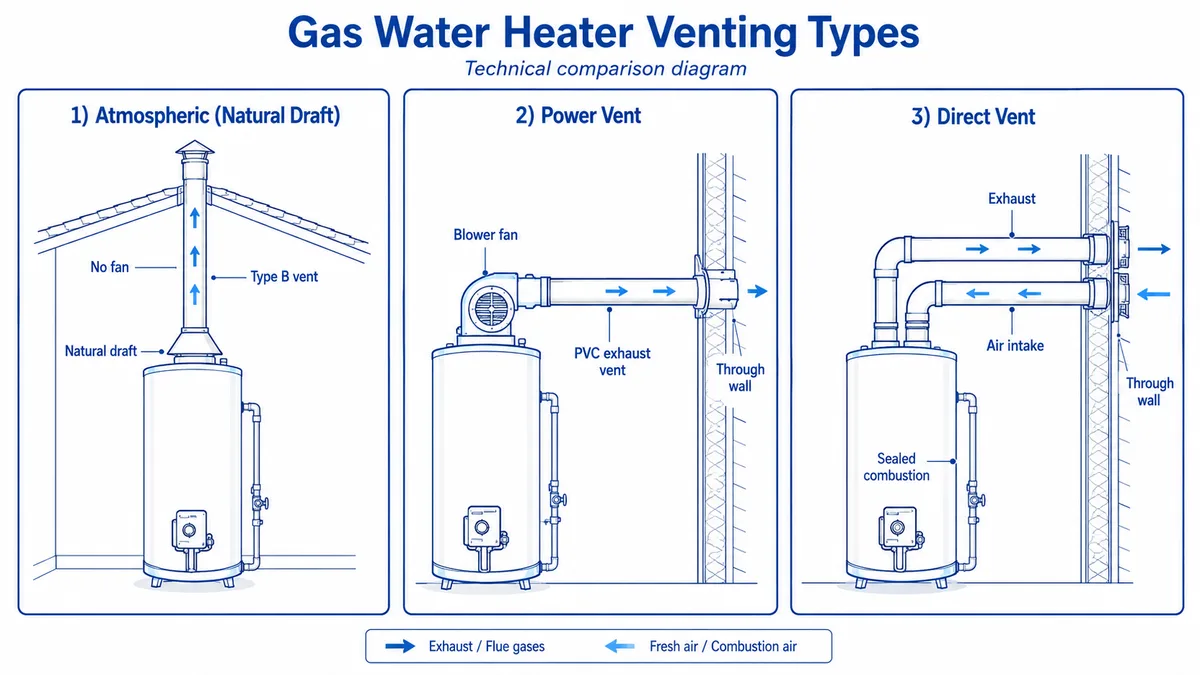
The International Fuel Gas Code (adopted locally by most jurisdictions) governs vent material, sizing, clearance to combustibles, and termination height for all three categories. Mixing vent materials or vent types on the same appliance, or reusing an old atmospheric flue for a power vent unit, is a common and dangerous shortcut.
Confined Space Combustion Air, With the Actual Numbers
Fuel gas codes define a "confined space" as a room with less than 50 cubic feet of volume for every 1,000 BTU/h of combined appliance input in that room. A typical 40,000 BTU/h atmospheric water heater in a small mechanical closet will fail that math fast, which is exactly why so many are installed in confined spaces without enough air on paper.
When a space does not meet the 50 cubic-foot rule, the fix is either venting the space to the outdoors or to a larger interior space through properly sized openings, sized at a minimum of 2 square inches of free area per 1,000 BTU/h of appliance input for outdoor air, or two openings (one within 12 inches of the floor, one within 12 inches of the ceiling) each sized at a minimum of 1 square inch per 1,000 BTU/h when connecting to an adjacent interior room. Skipping this calculation and just cutting a louvered door is a common shortcut that inspectors catch, and the failure mode it causes, incomplete combustion producing carbon monoxide, is silent until it is a 911 call.
Step by Step: Installing a Gas Water Heater
- Shut off the gas at the appliance valve and the water at the main or isolation valves.
- Drain the old tank and disconnect the gas flex connector, water lines, and vent.
- Set the new tank level and confirm clearances to combustibles match the manufacturer's manual.
- Connect cold inlet and hot outlet with dielectric unions to prevent galvanic corrosion between dissimilar metals.
- Install the sediment trap (a capped drip leg below the gas connection) ahead of the appliance gas valve, then the flexible or rigid gas connector.
- Connect the venting appropriate to the unit's category (atmospheric, power, or direct vent), matching material and diameter to the manufacturer's spec.
- Pipe the T&P relief valve discharge to within a few inches of the floor or to an approved drain, never capped and never reduced in diameter.
- Fill the tank completely with water before turning on gas or power, to avoid firing the burner or element dry.
- Leak-test every gas joint with an approved solution or electronic detector before lighting.
- Light the unit, confirm draft at the draft hood or power vent operation, and verify the water reaches temperature.
Step by Step: Installing an Electric Water Heater
- Shut off the dedicated circuit breaker (electric water heaters need their own circuit, typically 30 amp/240V for a standard residential tank) and the water supply.
- Drain and disconnect the old unit, confirming the circuit is dead before touching any wiring.
- Set the new tank level and connect cold inlet and hot outlet with dielectric unions.
- Wire the unit per the manufacturer's diagram, typically two hot legs to the upper thermostat/element junction box, with a proper ground.
- Pipe the T&P relief valve to a safe termination point, same as a gas unit.
- Fill the tank completely before restoring power, so the elements are never energized dry.
- Restore the breaker, confirm both thermostats are calling correctly (see below), and check for leaks at every fitting.
How the Electric Thermostat and Elements Actually Work
A standard residential electric tank has two heating elements and two thermostats, upper and lower, and on most units only one element fires at a time. The upper thermostat controls the top element until the upper third of the tank reaches setpoint, then it switches off and hands control to the lower thermostat and lower element, which heats the rest of the tank. This staged design is why a failed thermostat often shows up as a specific symptom rather than total failure:
- No hot water at all: usually the upper thermostat or upper element, since it fires first.
- Some hot water that runs out fast: usually the lower thermostat or lower element.
- Water too hot or the high-limit switch tripping: a thermostat stuck closed or miscalibrated, which is also a safety issue since it can push the tank toward T&P valve activation.
Thermostats are set behind an access panel and insulation, and most residential units are non-adjustable or have a limited safe range from the factory. Testing a suspect thermostat with a multimeter (continuity and resistance checks with power off) is the standard diagnostic step before replacing it.
Sizing the Replacement Correctly
A same-size swap is the default, but it is worth checking before the old tank comes out. Tank capacity (commonly 30, 40, 50, or 75 gallons for residential) should match household peak demand, not average demand, since the failure mode of undersizing is running out of hot water during simultaneous use (shower plus laundry, for example), not a slow decline. Gas units recover faster than electric for the same tank size because burner input is typically higher than an electric element's wattage allows, which matters for high-demand households considering a switch between fuel types. Recovery rate, not just tank size, is the number to compare between two units before installing either type.
Maintenance That Extends the Install
A correct installation is the starting point, not the end of the job. Two maintenance items determine whether it lasts a full service life:
- Anode rod inspection: the sacrificial anode corrodes instead of the tank's steel lining. Checked and replaced roughly every 2 to 5 years depending on water chemistry, it is the single biggest factor in whether a tank lasts a decade or fails in three years from internal corrosion.
- Annual flushing: draining a few gallons through the bottom drain valve removes sediment that insulates the burner or lower element from the water, forcing it to work harder and, on gas units, creating the popping or rumbling sound that signals sediment buildup.
The T&P Relief Valve Is Not Optional
The temperature and pressure relief valve prevents a tank from becoming a pressure vessel failure. It must be the correct rating for the tank, piped to within a few inches of a safe discharge point, and never capped or reduced. A missing, plugged, or improperly piped T&P valve is one of the most dangerous and most common field mistakes on both gas and electric installs.
Expansion Tanks and Closed-System Plumbing
If the home has a check valve, backflow preventer, or pressure-reducing valve on the main supply, the plumbing system is "closed": water can enter but thermal expansion from the water heater has nowhere to relieve itself back into the street main. Most current plumbing codes require a thermal expansion tank on closed systems for exactly this reason. Without one, every heating cycle pressurizes the system a little further, which is a second, independent way to trip the T&P valve, or worse, to fail it, even when the valve itself is correctly rated and piped.
The relief valve discharge pipe itself has its own rules: it must be full size (never reduced), sloped to drain, terminate no more than a few inches above a floor drain or the ground outside, and be made of a material rated for the discharge temperature, commonly CPVC, copper, or galvanized steel rather than standard PVC. Getting the T&P discharge material wrong is a related, and often overlooked, cousin of capping it outright.
Permits, Inspection, and the Mistakes That Fail Them
Water heater replacement is one of the most commonly permitted trade jobs precisely because of the combustion, electrical, and pressure-vessel risks involved. Inspectors most often fail an install for: a capped or misrouted T&P discharge, mixed or undersized venting materials, a missing sediment trap on the gas line, missing dielectric unions causing galvanic corrosion, or an electric unit sharing a circuit instead of running dedicated. All five are fixable in minutes during rough-in and expensive to fix after drywall is closed.
Water heater work overlaps plumbing, gas technician work, pipe joining and soldering, and backflow prevention on the closed-system side. Crews who cross-train across those trades catch more of these mistakes before inspection, not after.
Final Checklist Before Calling for Inspection
- T&P valve installed, correctly rated, full-size discharge pipe, terminating safely, never capped.
- Venting matches the unit's category (atmospheric, power, or direct vent), correct material, no mixed vent types.
- Combustion air calculated for the space; confined-space vent openings added if the room fails the 50 cubic-foot rule.
- Sediment trap installed on the gas line ahead of the appliance valve, every joint leak-tested.
- Dielectric unions at both water connections.
- Expansion tank installed if the system is closed (check valve, backflow preventer, or PRV present).
- Electric units: dedicated circuit sized correctly, both thermostats verified calling in sequence.
- Tank filled with water before gas or power was ever turned on.
WE BUILD THIS IN VR — THE PRIME VR
We build gas and electric water heater installs into VR so trainees practice relief-valve piping, flue venting, gas leak testing, and electric thermostat wiring on realistic units before they touch a live job. The scoring layer flags a capped relief valve, an undersized or mixed vent, a missing sediment trap, or a miswired thermostat, the exact mistakes that fail inspections and cause explosions or CO events.
Book a discovery callFrequently Asked Questions
Why is the T&P relief valve critical? +
The temperature and pressure relief valve releases pressure before a tank can rupture. It must be correctly rated, piped to a safe discharge point, and never capped. A missing or plugged valve makes the tank an explosion hazard.
What venting does a gas water heater need? +
It depends on the category. Atmospheric (natural draft) units vent vertically through Type B vent pipe to above the roofline. Power vent units use a blower and can vent horizontally, often through PVC because exhaust temperatures are lower. Direct vent units draw combustion air from outside and can also vent horizontally. All three need enough combustion air in the space, and mixing venting types on one flue is a code violation.
What is a sediment trap on the gas line? +
A sediment trap (drip leg) is a short capped nipple installed below the gas connection that catches debris and condensation in the gas supply before it reaches the control valve. Most fuel gas codes require it directly ahead of the appliance's gas valve.
How do I install a gas water heater step by step? +
Turn off gas and water, drain and disconnect the old unit, set the new tank level, connect cold inlet and hot outlet with dielectric unions, install the sediment trap and flexible gas connector, connect the correct venting for the unit's category, pipe the T&P valve to a safe termination point, fill the tank before lighting, leak-test every gas joint, and verify draft and temperature before closing up.
What is a gas water heater with a power vent? +
A power vent water heater has a small blower fan that pushes exhaust out mechanically instead of relying on natural draft. That lets it vent horizontally through a wall, which is useful when there is no vertical chimney chase, but it also requires an electrical outlet at the unit and a condensate drain in most models.
How does an electric water heater thermostat work? +
A standard electric tank has two thermostats and two heating elements, upper and lower. The upper thermostat controls the top element until the top section reaches temperature, then hands off to the lower thermostat and element. Only one element fires at a time on most residential units, which is why a bad thermostat often shows up as inconsistent hot water rather than none at all.
Do I need a permit to install a water heater? +
In most jurisdictions, yes. Water heater replacement is one of the most commonly permitted trade jobs because of the gas, electrical, and life-safety elements involved, and most local codes require inspection of the venting and relief valve termination before it is signed off.
What is the most common water heater installation mistake? +
Capping or misrouting the T&P relief valve discharge, undersizing or mixing venting materials, and skipping the sediment trap on the gas line. All three are code violations that also happen to be the failure points most likely to cause an explosion, a fire, or a carbon monoxide incident.
Do I need an expansion tank? +
If the home's plumbing is a closed system, meaning there is a check valve, backflow preventer, or pressure-reducing valve on the main supply, then yes, most current codes require a thermal expansion tank. Without one, thermal expansion during heating cycles has nowhere to go and pressurizes the system, which is an independent way to stress or trip the T&P relief valve even when the valve itself is correctly installed.
How long does a water heater installation take? +
A straightforward same-type replacement (gas to gas, electric to electric, same venting category) typically runs a few hours for removal, set, connections, and testing. A fuel-type or venting-category change, such as moving from atmospheric to power vent, or from electric to gas, adds significant time for new venting, gas piping, or electrical circuit work, and usually requires its own permit review.
Train safe water heater installs
We build your install and life-safety checks into scored VR practice.